I wanted to do this for quite some time, but kept putting it off because of work etc… I had a lull in my schedule recently so I finally decided to go through with it.
Note: When I say “Security Paper”, obviously there is only so much you can do with ordinary household items. If even sophisticated security implementations can be cracked, this doesn’t really stand a chance. Think of it more on terms of an artistic project. Besides, security is always relative to what you need to protect. In this case, It’s just for unique, difficult to duplicate stationary and not for any fool-proof security.
There are no special refractive inks, holograms, RFID tags or any other sophisticated anti-counterfeit measures.
Also of note is that inkjet printers, of which I own the Canon MP150 all-in-one, don’t always print the same pixel in the same exact location on different sheets of paper. Being mechanical devices, they are limited to the accuracy of the pickup reels, paper loader size and paper quality. So this will all be printed in one shot and all secondary security features need to implemented on the paper itself.
This is quite a long post (and the first, I think, that goes on to multiple pages), so please bare with me…
Design
I’ll be using Photoshop CS2 for the design phase, but any relatively recent version should do. The techniques should also apply to GIMP, but I haven’t tried doing this with it yet.
This needs to fit into a sheet of 8.5 x 11 inch printer paper so the document needs to be slightly smaller than that. Keep in mind that some printers have different thresholds when it comes to the maximum printable area, so try not to go too far to the edge.
Start with a document sized 2400 x 3600 pixels at 300 DPI resolution. This will come very close to filling the whole page and give enough detail.
There are a number of security features introduced in the past that make counterfeiting difficult, but the easiest to implement yourself is the security background pattern. These patterns make tracing quite difficult and, once the content text is printed on top, alteration extremely difficult to near impossible even using modern image editing software. There are countless line intersections with the printed text making selections tedious enough to dissuade the casual counterfeiter. Of course, if the document was valuable enough, a motivated individual won’t be discouraged by the difficulty.
These dimensions need not be exact, but I started with another document at 100 pixels for the background pattern.
This need not be overly complex. In fact, I used the existing “Tile 2” grate-like pattern that comes with Photoshop. You can create your own pattern as long as it repeats well and isn’t too simple or too large. The size of the unique shape should be around 50 – 70 pixels. Any larger, and you lose the security benefit. Any smaller, and the printer may not be able to handle the detail very well (this is DIY, remember).
Then apply it to your “background” document (the small one) and trim the pattern.
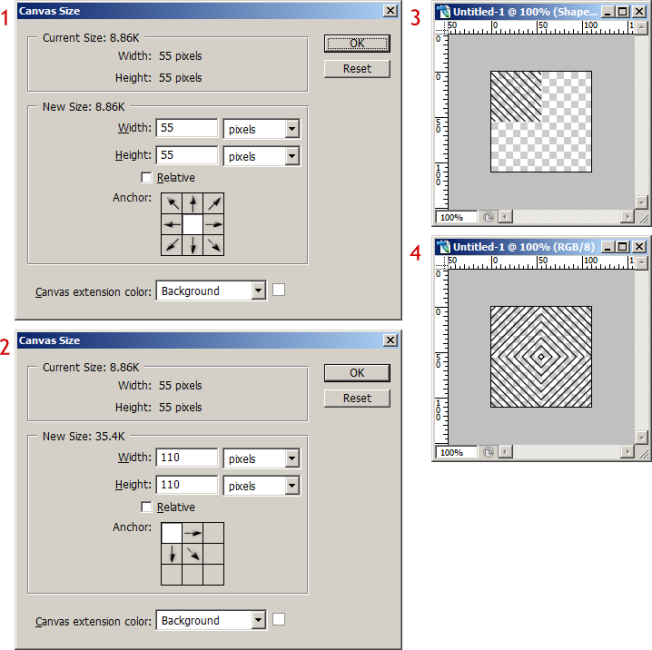
I’ll be creating a diamond shaped security pattern so I’ll need to double the length and width of this document. I’ll then duplicate the pattern, flip horizontally and move to the left. Then I’ll duplicate both new layers and flip it vertically to create the diamond.
Then we define it as a pattern. This will be the backdrop for the whole document and all other elements on page will also be created from this pattern (explained further below). I called it “Grid focus”.
Now that we have the background pattern, we can go back to our original full sized document and apply this newly created pattern. Set the background layer opacity to around 25%-30%.


